Follow the steps here to reset printers pads Epson Stylus Photo 1430W, look at all the steps of correct forms, because they vary a bit from the previous processes.
Reset an Epson printer is necessary when it comes to the average 15,000 pages — this will depend on which printer we use — this is blocked and does not allow printing more because you need to replace pads located on the bottom of the purge.
Here you get both the file to restore the printer as a link that will tell you to do it properly. But in this case we have an influencing factor, not seen before in other resets called activator reset.
It is recommended to disable antivirus because the activator for the reset function does he is recognized as virus, this will not cause any problems to computers can not worry.
Now run the software as it is was reset for another printer, only the sequential option adjustment mode is disabled — to activate the trigger to use — follow the steps below to activate the reset and function properly.
Buy here using PayPal...
Download adjustment pad counter and activator reset program here...
To enable sequential adjustment mode follow the directions below, please remember if you have a problem post a comment, we will gladly help you.
Executes the activator adjustment
The following icon appears a black window will open with the name in the upper part enable! (c) 2003 H&C Works ver 1.3d.
Run the program to reset adjustment pads
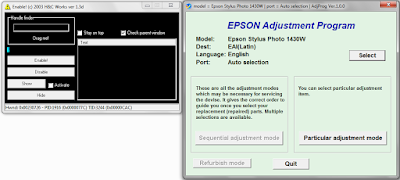
Installation accept the terms and continue with OK (bottom right) with two programs one on the left side. image below...
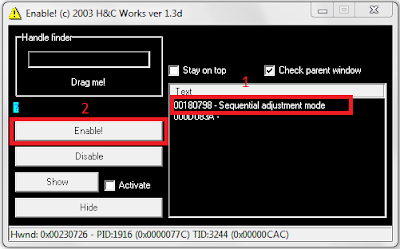
We dragged (Drag me!) To take it to sequential mode adjustment
Left-click to grab and drag until sequential adjustment mode what it says Drag me!. view image...
The program presents an habitation text below the text section to select
 |
| epson pads and reset the 1430w |
It is recommended to disable antivirus because the activator for the reset function does he is recognized as virus, this will not cause any problems to computers can not worry.
 |
| reset program to enable 1430w |
Buy here using PayPal...
Download adjustment pad counter and activator reset program here...
To enable sequential adjustment mode follow the directions below, please remember if you have a problem post a comment, we will gladly help you.
Executes the activator adjustment
The following icon
 appears a black window will open with the name in the upper part enable! (c) 2003 H&C Works ver 1.3d.
Run the program to reset adjustment pads
Installation accept the terms and continue with OK (bottom right) with two programs one on the left side. image below...
 |
| adjustment program next activator |
Left-click to grab and drag until sequential adjustment mode what it says Drag me!. view image...
 |
| how you should grab with left click and drag |
When you drag the Drag me! appears a line of text Sequential adjustment mode to be selected and then click Enable! (marked with the number two) must be enabled option Sequential adjustment mode.
 |
| image adjustment mode activator being activated |
Adjustment mode activated and steps (other than above procedures)
Now you must click Sequential adjustment mode — activated after the above procedure — where a number of options appear to click on next. see image below...
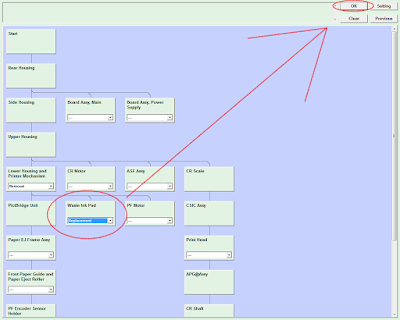
In the options you should go to Waste Ink Pad
Drop down options and select replacement, then at the top right, then click OK. see image below...
Select check & initialization the points (0 column and 80 column)
Then click Check to see if everything is working properly. see image below...
If no error occurs again selected (0 column and 80 column) and inilialization with this procedure is finished completely.
Final step select options 0 column and 80 column more click initiliazation
If no error occurs when pressed check mark the boxes mentioned and then initialization to complete the process.
First turn off or unplug the printer and then close the message that appears, then this printer should end completely restored. Remember if this does not solve the problem post a comment.
Now you must click Sequential adjustment mode — activated after the above procedure — where a number of options appear to click on next. see image below...
 |
| clicking sequential mode adjustment epson |
Drop down options and select replacement, then at the top right, then click OK. see image below...
 |
| waste ink pad and then click ok top right |
Then click Check to see if everything is working properly. see image below...
 |
| waste ink pad counter option |
Final step select options 0 column and 80 column more click initiliazation
If no error occurs when pressed check mark the boxes mentioned and then initialization to complete the process.
 |
| click to complete the process initialization |


COMMENTS